1) ERD
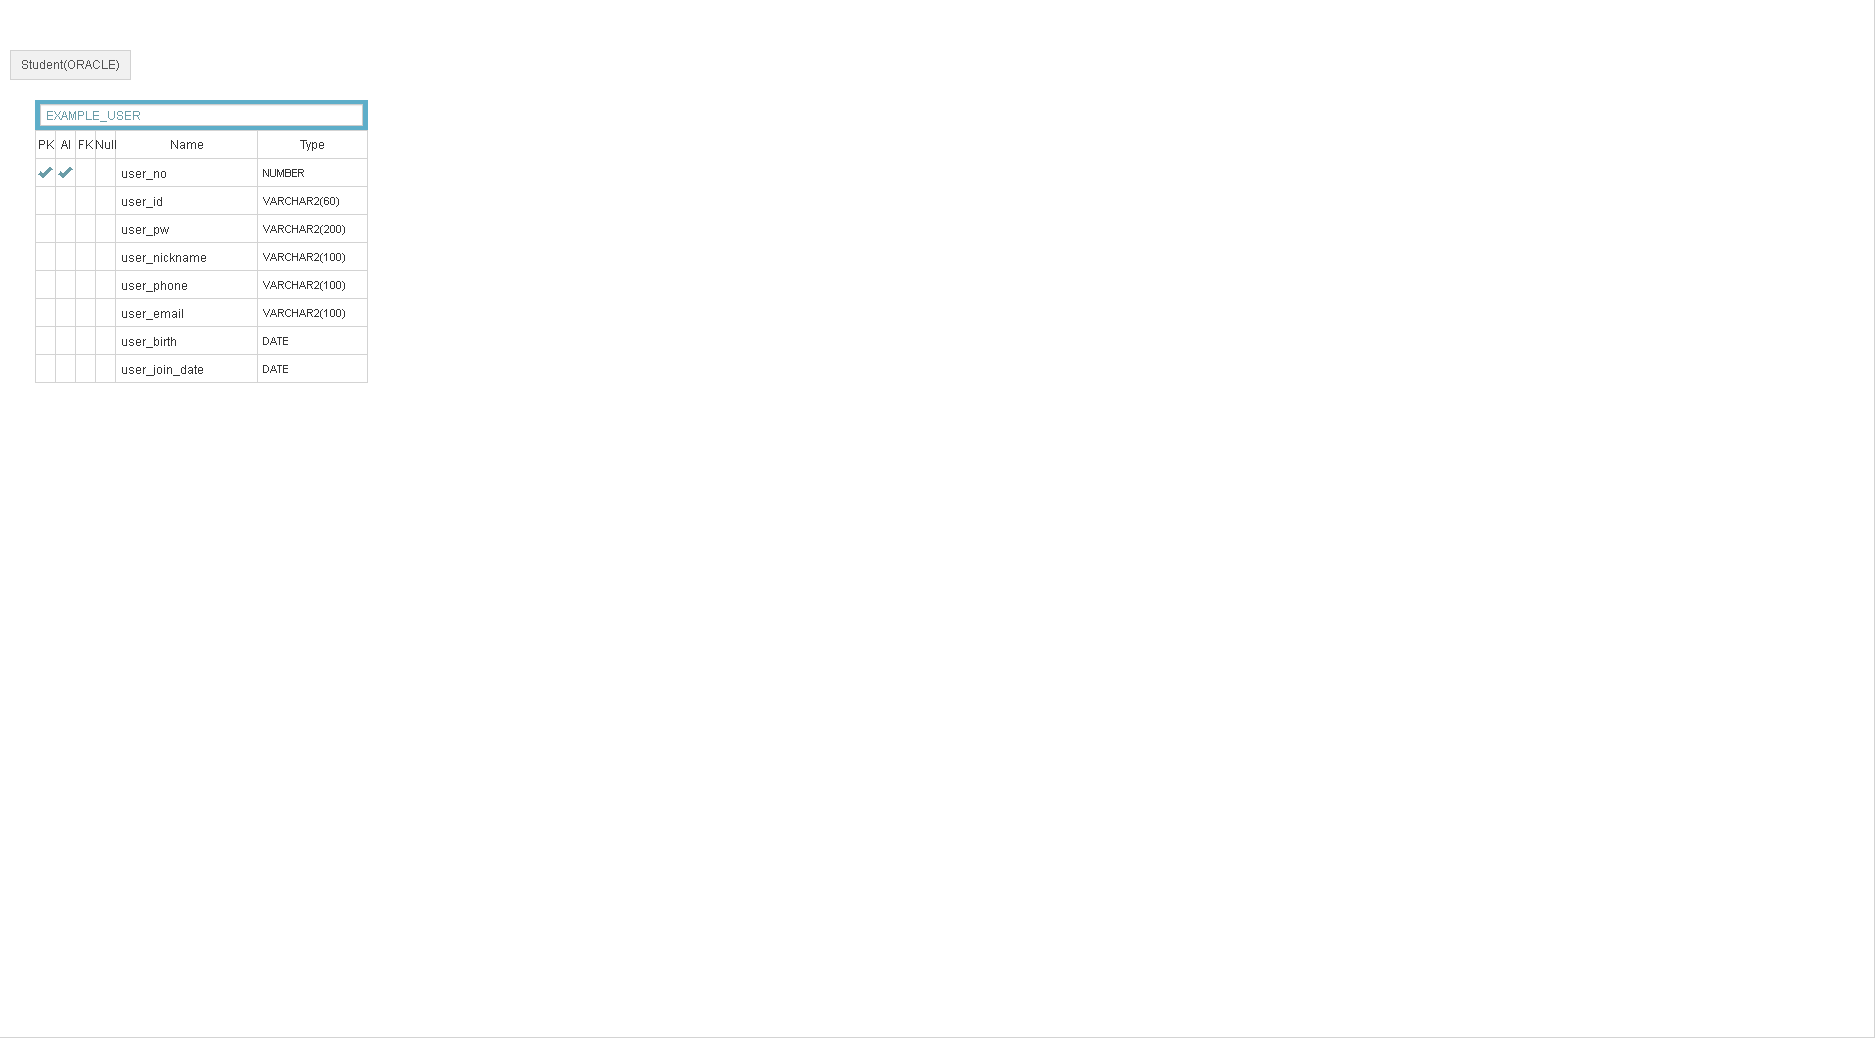
2) DB 생성
1 2 3 4 5 6 7 8 9 10 | CREATE TABLE EXAMPLE_USER( user_no NUMBER PRIMARY KEY, user_id VARCHAR2(100) NOT NULL, user_pw VARCHAR2(300) NOT NULL, user_nickname VARCHAR2(50) NOT NULL, user_phone VARCHAR2(200) NOT NULL, user_email VARCHAR2(490) NOT NULL, user_birth DATE NOT NULL, user_joindate DATE NOT NULL ); | cs |
3) 파일 및 패키지 생성
3-1. UserController.java 생성
1 2 3 4 5 6 7 8 9 10 11 12 13 | package com.spring.example.user.controller; import org.springframework.stereotype.Controller; import org.springframework.web.bind.annotation.RequestMapping; @Controller @RequestMapping("/user/*") public class UserController { } | cs |
- 5행 : @Controller 어노테이션 선언으로 Controller 객체임을 선언한다.
- 6행 : @RequestMapping 어노테이션 선언으로 url 패턴을 선언한다.
3-2. UserVO.java 생성
1 2 3 4 5 6 7 8 9 10 11 12 13 14 15 16 17 18 19 20 21 22 23 24 25 26 27 28 29 30 31 32 33 34 35 36 37 38 39 40 41 42 43 44 45 46 47 48 49 50 51 52 53 54 55 56 57 58 59 60 61 62 63 64 65 66 67 68 69 70 71 72 73 74 75 76 77 78 79 80 81 82 83 84 85 86 87 88 89 90 91 92 93 94 95 96 97 98 99 100 101 102 103 104 105 106 107 108 109 | package com.spring.example.vo; import java.util.Date; import org.springframework.format.annotation.DateTimeFormat; public class UserVo { private int user_no; private String user_id; private String user_pw; private String user_nickname; private String user_phone; private String user_email; @DateTimeFormat(pattern = "yyyy-MM-dd") private Date user_birth; @DateTimeFormat(pattern = "yyyy-MM-dd") private Date user_joindate; public UserVo() { super(); } public UserVo(int user_no, String user_id, String user_pw, String user_nickname, String user_phone, String user_email, Date user_birth, Date user_joindate) { super(); this.user_no = user_no; this.user_id = user_id; this.user_pw = user_pw; this.user_nickname = user_nickname; this.user_phone = user_phone; this.user_email = user_email; this.user_birth = user_birth; this.user_joindate = user_joindate; } public int getUser_no() { return user_no; } public void setUser_no(int user_no) { this.user_no = user_no; } public String getUser_id() { return user_id; } public void setUser_id(String user_id) { this.user_id = user_id; } public String getUser_pw() { return user_pw; } public void setUser_pw(String user_pw) { this.user_pw = user_pw; } public String getUser_nickname() { return user_nickname; } public void setUser_nickname(String user_nickname) { this.user_nickname = user_nickname; } public String getUser_phone() { return user_phone; } public void setUser_phone(String user_phone) { this.user_phone = user_phone; } public String getUser_email() { return user_email; } public void setUser_email(String user_email) { this.user_email = user_email; } public Date getUser_birth() { return user_birth; } public void setUser_birth(Date user_birth) { this.user_birth = user_birth; } public Date getUser_joindate() { return user_joindate; } public void setUser_joindate(Date user_joindate) { this.user_joindate = user_joindate; } @Override public String toString() { return "UserVo [user_no=" + user_no + ", user_id=" + user_id + ", user_pw=" + user_pw + ", user_nickname=" + user_nickname + ", user_phone=" + user_phone + ", user_email=" + user_email + ", user_birth=" + user_birth + ", user_joindate=" + user_joindate + "]"; } } | cs |
- 8행 ~ 17행 : DB 필드들을 선언한다.
- 19행 ~ 34행 : Using Field를 만든다 Alt+Shift+S를 눌러서 Genterate Constructor using Fields로 쉽게 만들 수 있다.
- 36행 ~ 98행 :Getter/Setter를 만든다. Alt+Shift+S를 눌러서 Generate Getters and Setters로 쉽게 만들 수 있다.
3-3 UserService.java 생성
1 2 3 4 5 6 7 8 9 | package com.spring.example.user.service; import org.springframework.stereotype.Service; @Service public class UserService { } | cs |
- 5행 : @Service 어노테이션으로 Service 객체임을 선언한다
3-4 UserSQLMapper.java 생성
1 2 3 4 5 6 | package com.spring.example.user.mapper; public interface UserSQLMapper { } | cs |
3-5 UserSQLMapper.xml 생성
1 2 3 4 5 6 7 8 | <?xml version="1.0" encoding="UTF-8"?> <!DOCTYPE mapper PUBLIC "-//mybatis.org//DTD Mapper 3.0//EN" "http://mybatis.org/dtd/mybatis-3-mapper.dtd"> <mapper namespace="com.spring.example.user.mapper.UserSQLMapper"> </mapper> | cs |
- 3행 : mapper는 namespace로 com.spring.example.user.mapper.UserSQLMapper이라는 이름을 지정한다.
4) index.jsp
1 2 3 4 5 6 | <div class="row mt-1"> <div class="col"> <a href="./userAgree">회원가입</a> </div> </div> | cs |
- 3행 요청 URL를 설정한다. 회원가입을 누르면 controller의 <"/userAgree"> 를 찾아 갈 것이다.
5) UserController.java ("userAgree")
1 2 3 4 | @RequestMapping("userAgree") public String userPage() { return "user/userAgree"; } | cs |
- 1행 : @RequestMapping 어노테이션은 요청 URL을 매핑하여 해당 메서드를 실행한다.
- 3행 : 보여줄 화면의 jsp경로이다. ModelAndView를 사용하기도 하고, String으로 경로주소를 바로 적는 경우도 있다.
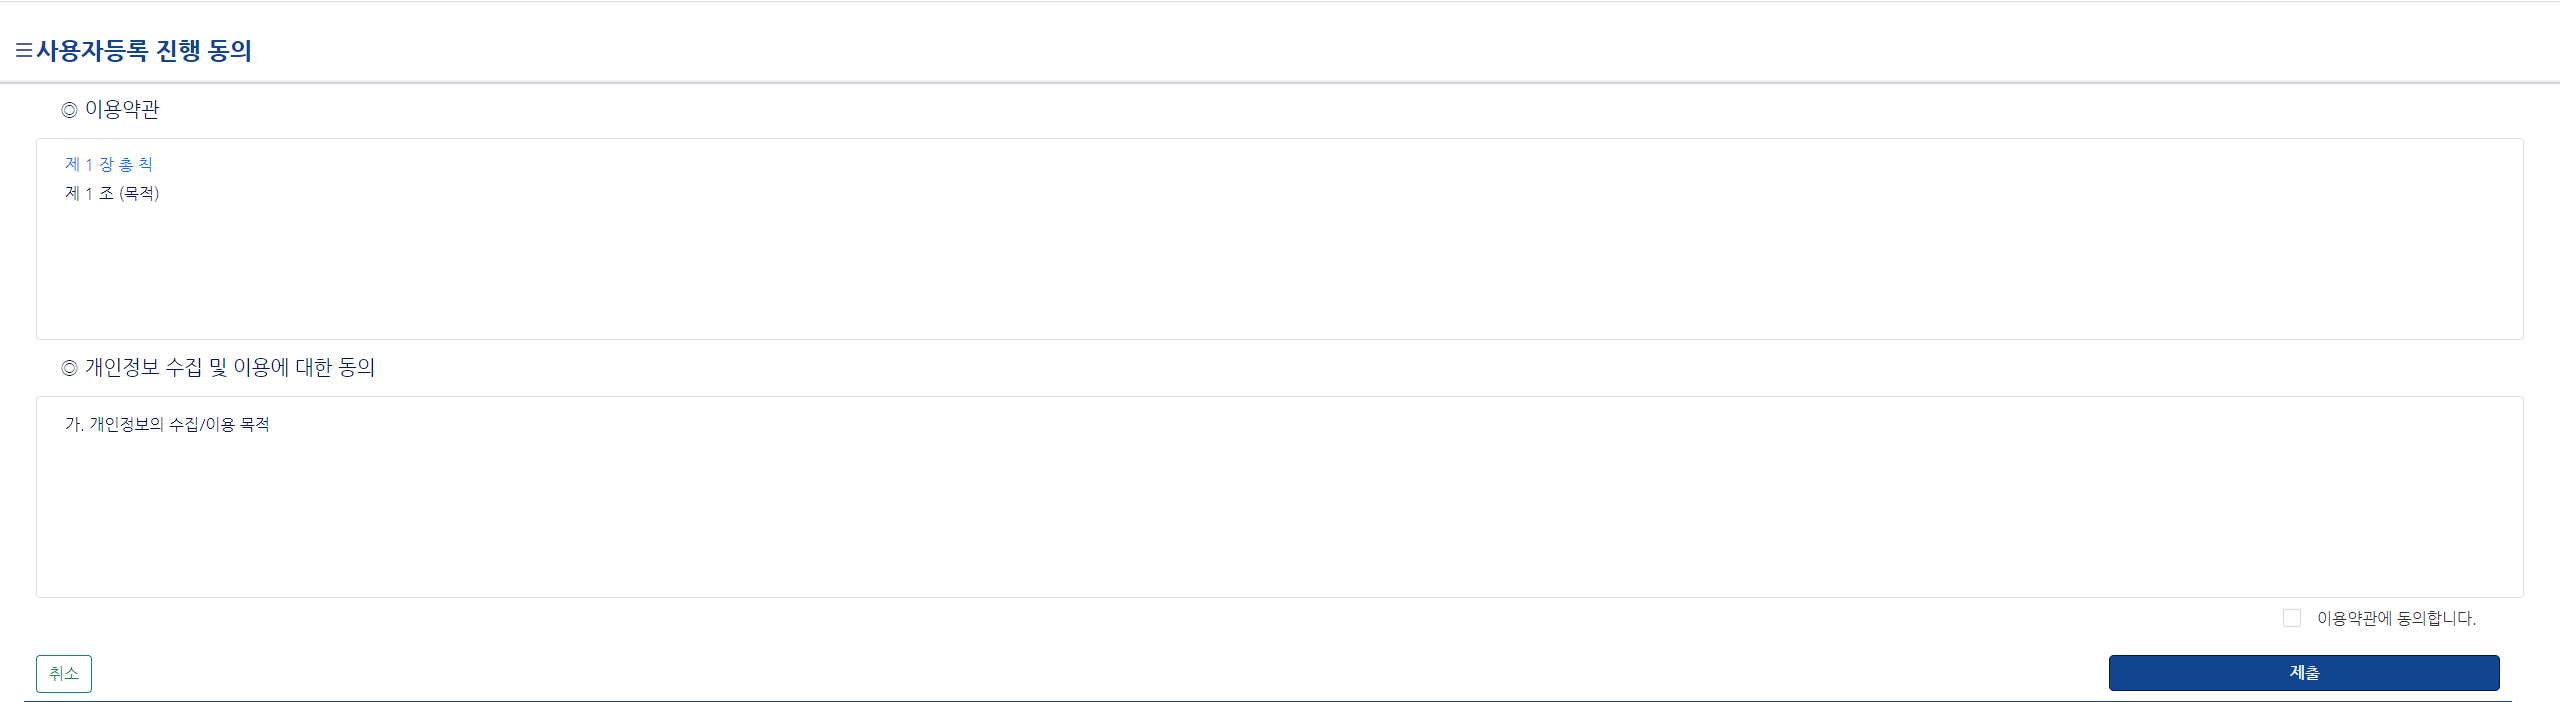
6) UserAgree.jsp
1 2 3 4 5 6 7 8 9 10 11 12 13 14 15 16 17 18 19 20 21 22 23 24 25 26 27 28 29 30 31 32 33 34 35 36 37 38 39 40 41 42 43 44 45 46 47 48 49 | <div class="col"> <!-- 페이지별 내용 시작--> <div class="row mt-1 conTitleArea"> <h3 class="conTItle"><i class="bi bi-list"></i>사용자등록 진행 동의</h3> </div> <div class="row fs-6 deepblue fw-bold ps-5"> <h5>◎ 이용약관</h5> </div> <form id="joinUserPage" action="./joinUserPage" post="get"> <div class="row formTable"> <div class="card"> <div class="card-body" style="overflow:auto; height:200px;"> <h6 class="text-primary">제 1 장 총 칙<br></h6> <div class="deepblue">제 1 조 (목적)<br></div> <br> </div> </div> <div class="row fs-6 deepblue fw-bold ps-4 mt-3"> <h5>◎ 개인정보 수집 및 이용에 대한 동의</h5> </div> <div class="card mt-2"> <div class="card-body" style="overflow:auto; height:200px;"> <div class="deepblue">가. 개인정보의 수집/이용 목적</div> </div> </div> <div class="row text-end mt-1"> <div style="float:right;"> <input type="checkbox" name="agree" value="true" id="agreed"> <label>이용약관에 동의합니다. </label> </div> </div> <div class="row formEndBorder mt-3"> <div class="col-1"> <button type="button" onclick="http://localhost:8181/index.jsp" class="btn btn-outline-success">취소</button> </div> <div class="col"></div> <div class="col-2"> <input type="submit" class="btnBasic inputSubmit" value="제출"> </div> </div> </div> </form> <!-- 페이지별 내용 끝 --> </div> | cs |
- 11번행 : form태그이다. action으로 Controller에 요청 URL "./joinUserPage"를 보낸다.
- 31번행 : input 태그로 타입을 checkBox로 만든다. 체크를 하면 다음 단계로 넘어가게 한 것이다.
- 41번행 : input 태그로 타입을 button로 만든다. 버튼을 누르면 다음단계로 넘어가는데 체크박스를 체크 하지 않으면 넘어가지 않게 할 생각이다.
위 3개행 뺴고는 css 라 따로 안보아도된다.
7) 확인
서버를 실행 시켜보자 index.jsp 이다. css을 입힌거다.

화면이 나왔다 !!! 성공이다.
8) UserController.java ("joinUserPage")
1 2 3 4 5 6 7 8 | @RequestMapping("joinUserPage") public String joinUserPage(@RequestParam(value="agree", defaultValue="false") boolean agree) { if (!agree) { return "user/userAgree"; } else { return "user/joinUserPage"; } } | cs |
- 1행 : @RequestMapping 어노테이션을 선언한다.
- 2행 : userArgee.jsp에서 31행의 input태그의 이름이 agree이다. form태그로 타고 온 파라미터값이다. 디폴트값이 false다.
- 3~5행 : agree의 checkbox가 true가 아니면(체크하지 않았으면) 다시 userArgee.jsp로 돌려보낸다.
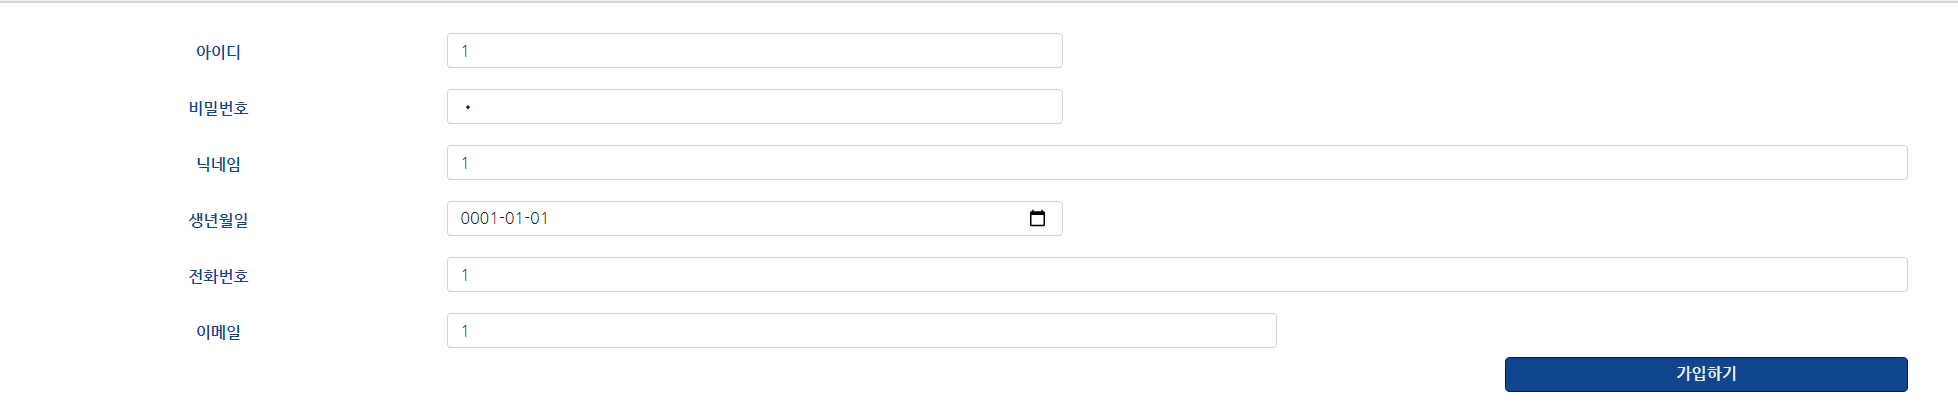
9) joinUserPage.jsp
1 2 3 4 5 6 7 8 9 10 11 12 13 14 15 16 17 18 19 20 21 22 23 24 25 26 27 28 29 30 31 32 33 34 35 36 37 38 39 40 41 42 43 44 45 46 47 48 49 50 51 52 53 54 55 56 57 58 59 60 61 62 63 | <div class="col"> <form id="insertForm" method="post" action="./insertUserProcess"> <div class="row mt-2" id="submitOptionBox"> <!-- 옵션박스 --> <div class="col"> <!-- 아이디 입력 --> <div class="row mt-3"> <div class="inputTitle">아이디</div> <div class="col-3 fs-5"><input class="form-control" id="joinIdInput" name="user_id" type="text" placeholder="아이디를 입력해 주세요." aria-label="default input example"> </div> </div> <!-- 비밀번호 입력 --> <div class="row mt-3"> <div class="inputTitle">비밀번호</div> <div class="col-3 fs-5"><input class="form-control" id="changePassword" type="password" placeholder="비밀번호를 입력해주세요." aria-label="default input example"></div> </div> <div class="row mt-3"> <div class="inputTitle">닉네임</div> <div class="col fs-5"><input class="form-control" id="userName" name="user_nickname" type="text" placeholder="닉네임 입력해 주세요." aria-label="default input example"> </div> <div class="col-3"></div> </div> <!-- 생년월일 --> <div class="row mt-3"> <div class="inputTitle">생년월일</div> <div class="col-3 fs-5"><input class="form-control" id="inputBirth" type="date" name="user_birth"></div> </div> <!-- 전화번호 --> <div class="row mt-3"> <div class="inputTitle">전화번호</div> <div class="col fs-5"><input class="form-control" id="userPhone" name="user_phone" type="text" placeholder="전화번호를 입력해주세요." aria-label="default input example"> </div> <div class="col-3"></div> </div> <!-- 이메일 --> <div class="row mt-3"> <div class="inputTitle">이메일</div> <div class="col-4 fs-5"><input class="form-control" id="userEmail" name="user_email" type="text" placeholder="이메일을 입력해 주세요." aria-label="default input example"> </div> <div class="col-2"></div> </div> <div class="row mt-1"> <div class="col"></div> <div class="col-2 d-grid mb-3 "><input type="submit" class="btnBasic inputSubmit" value="가입하기"></div> <div class="col-3"></div> </div> </div> </div> </form> </div> | cs |
- 2번행 : form태그이다. action으로 Controller에 요청 URL "./insertUserProcess"를 보낸다. method="post"를 하게 되면 파라미터 값들이 주소에 보이지 않게된다.
- 8번행 : input 태그이다. name의 이름은 UserVo.java에 있는 이름과 동일하게 설정해야된다.
10) 확인
10-1. 동의하지 않고 다음단계를 누른다.
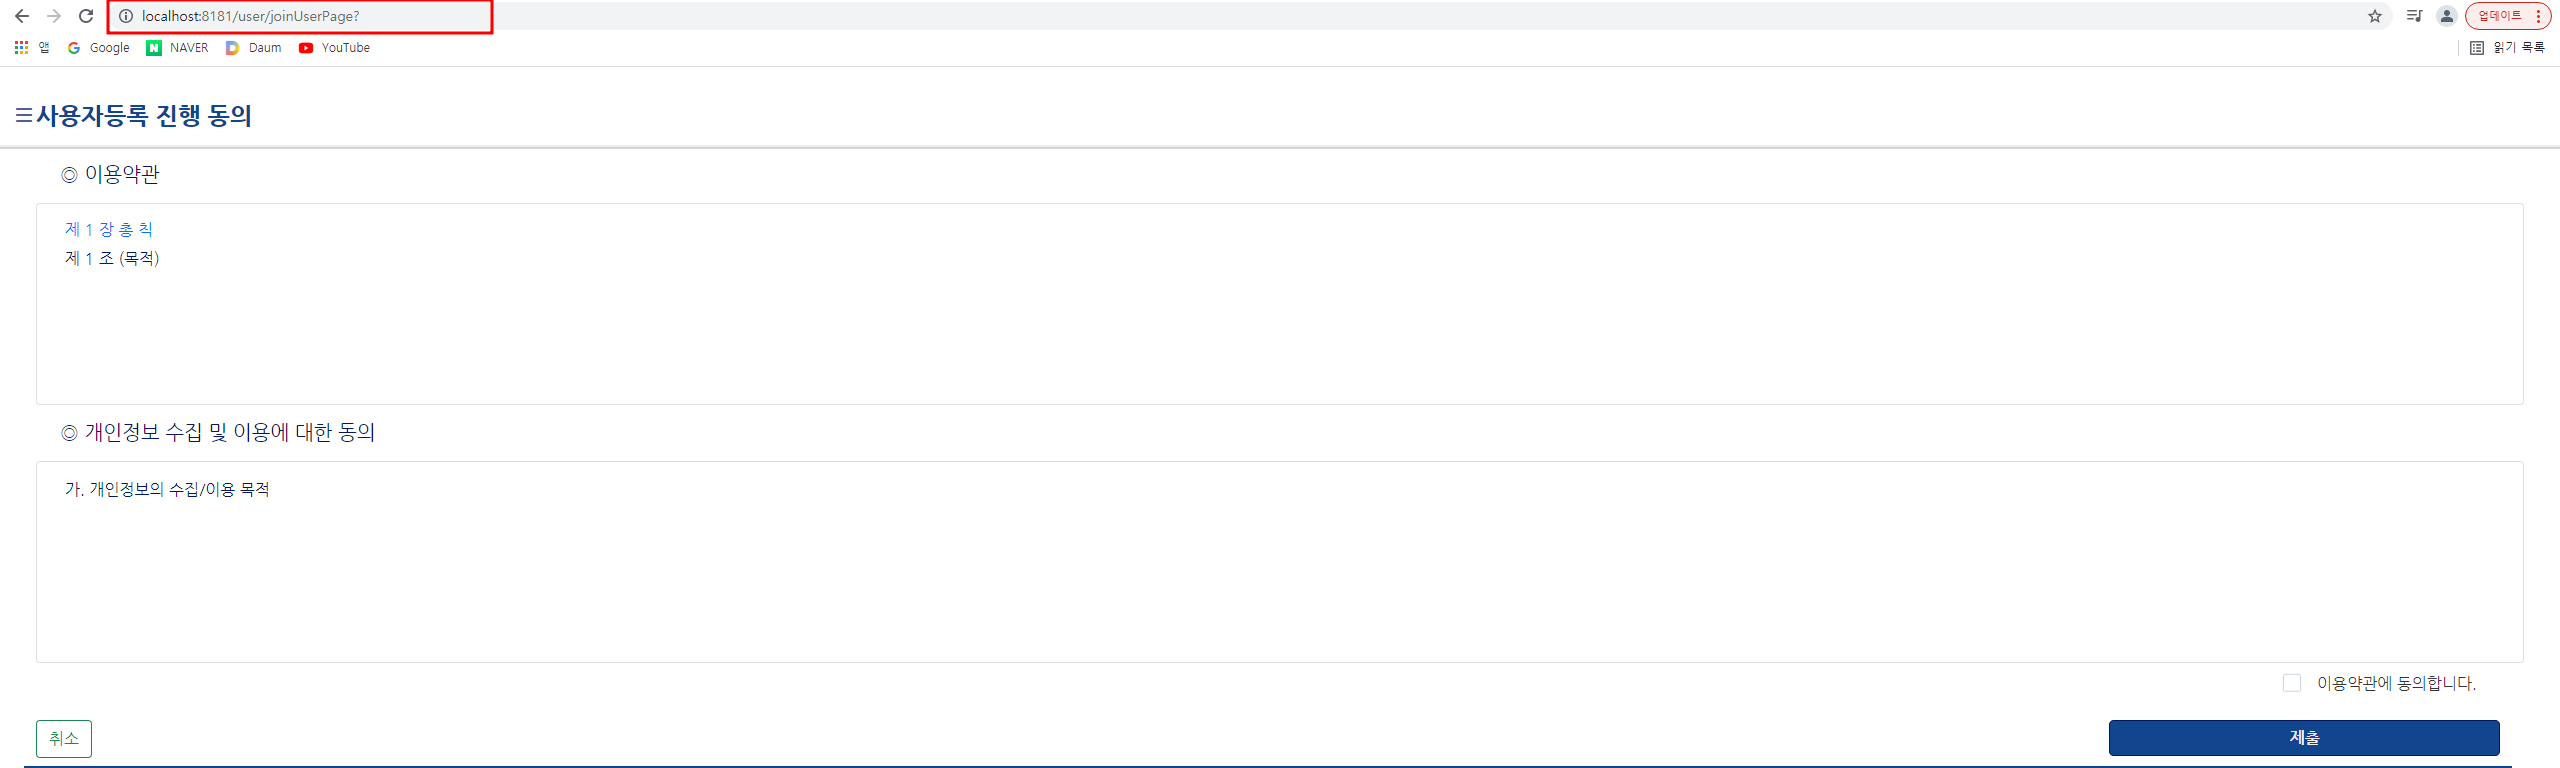
joinUserPage.jsp로 넘어가지 않고 userAgree.jsp페이지에 머물러 있는것을 확인 할 수 있다.
10-2 이용약관에 동의합니다 체크하고 제출 버튼을 누른다.

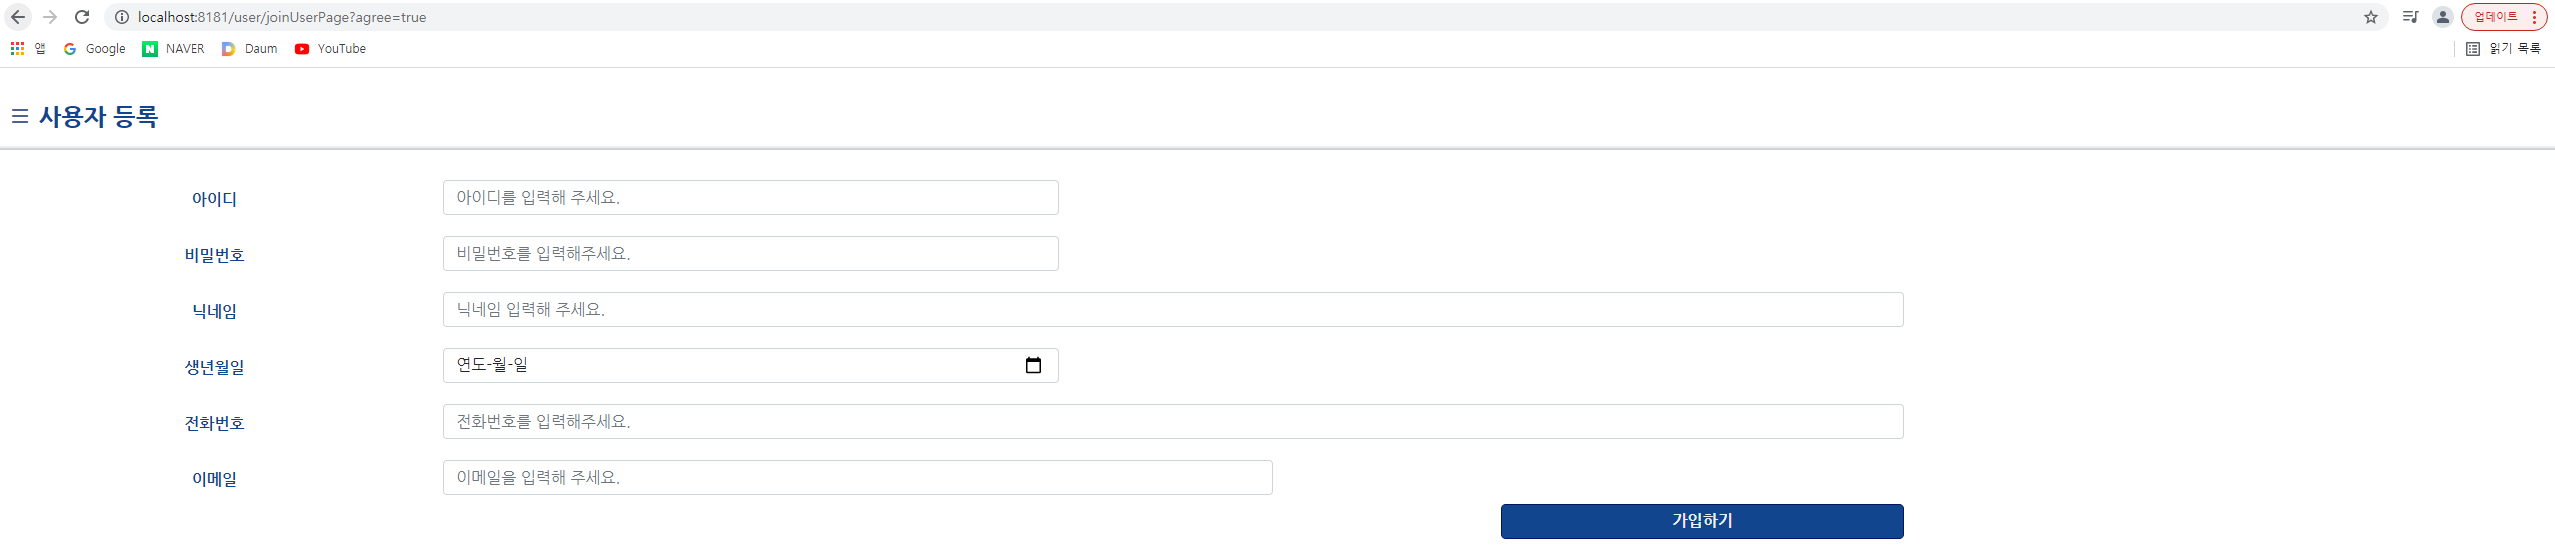
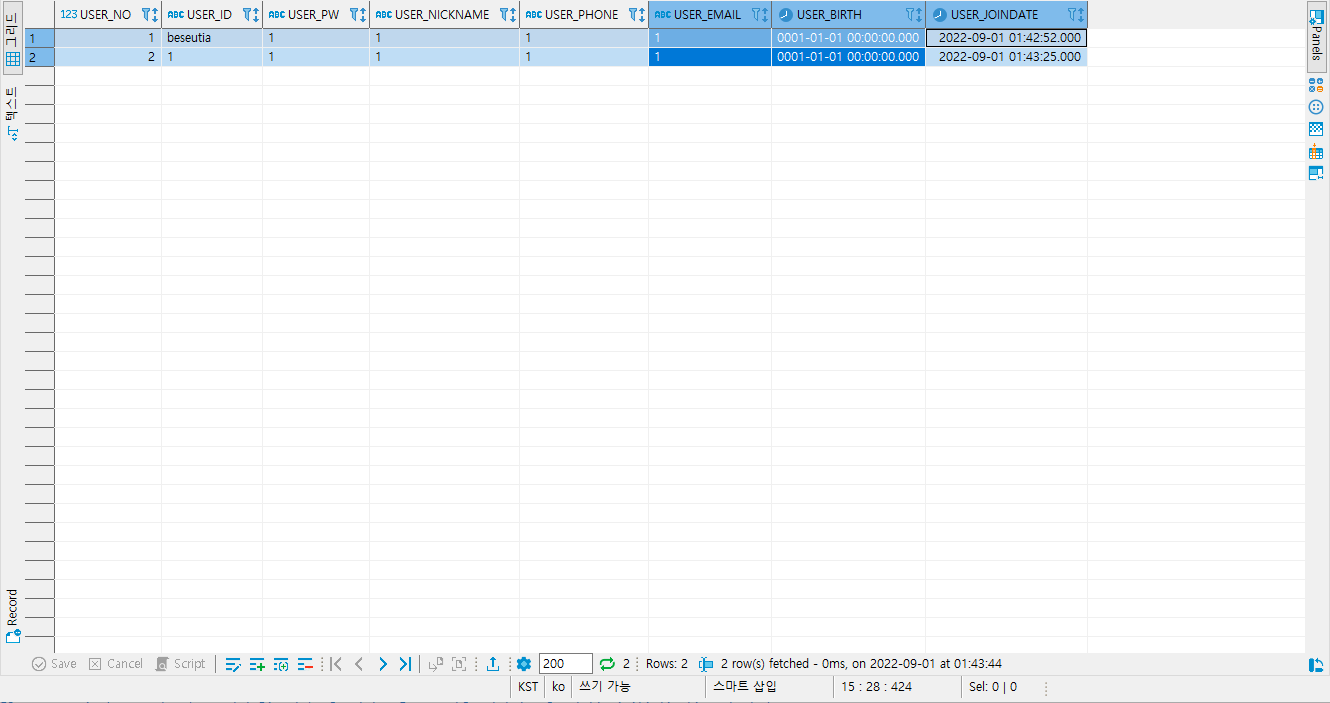
넘어와졌다. 성공!
11) UserController.java("inserUserProcess")
1 2 3 4 5 6 7 8 9 10 | @Autowired UserService userService; @RequestMapping("insertUserProcess") public String insertUserProcess(UserVo param) { userService.insertUser(param); return "user/joinUserCompletPage"; } | cs |
- 1행 : @Autowired 어노테이션을 선언한다 : 필요한 의존 객체의 “타입"에 해당하는 빈을 찾아 주입한다.
- 2행 : UserService userService : UserService.java를 빈에 주입해준다
- 4행 : @RequestMapping 어노테이션을 선언한다. (변수로서 UserVo의 값을 받아온다)
- 7행 : UserService.java 안에 insertUser method 를 실행한다.
12) UserService.java
1 2 3 4 5 6 7 8 9 | @Autowired UserSQLMapper userSQLMapper; public void insertUser(UserVo param) { userSQLMapper.insertUser(param); } | cs |
- 1행 : @Autowired 어노테이션을 선언한다 : 필요한 의존 객체의 “타입"에 해당하는 빈을 찾아 주입한다
- 2행 : UserSQLMapper userSQLMapper : userSQLMapper.java 를 빈에 주입해준다
- 6행 : UserSQLMapper.java에 inserUser method 를 실행한다.
13) UserSQLMapper.java
1 2 | public void insertUser(UserVo param); | cs |
- 1행 : userSQLMapper.xml 에 실행될 아이디를 insertUser로 지정해준다
14) UserSQLMapper.xml
1 2 3 4 5 6 7 8 9 10 11 12 | <insert id="insertUser"> INSERT INTO EXAMPLE_USER VALUES ( #{Example_User_seq.nextval}, #{user_id}, #{user_pw}, #{user_nickname}, #{user_phone}, #{user_email}, #{user_birth}, SYS ) </insert> | cs |
15) joinUserCompletPage.jsp
1 2 3 4 5 6 7 8 9 10 11 12 13 14 15 16 17 18 19 20 21 22 23 24 25 26 | <div class="row" id="container"> <div class="col-1" style="width:5%;"></div> <div class="col"> <jsp:include page="../commons/mainNav.jsp"></jsp:include> <div class="row mt-3"> <div class="col-1" style="width:13%;"> <jsp:include page="../commons/loginBox.jsp"></jsp:include> <div class="row"> <div class="col"></div> </div> </div> <div class="col ps-5" style=""> <!-- 각 페이지 내용 여기에 들어가면 됩니다 --> <div class="row mt-2"> <!-- subtitle --> <div class="col fs-2"> 회원 가입이 완료되었습니다 ! </div> </div> <div class="row mt-3 divisionLine"></div> </div> <div class="col-2" style="width:13%;"></div> </div> </div> <div class="col-1" style="width:5%;"></div> </div> | cs |
16) 최종확인

끝났당!!!!!
이제 남은것은 아이디 중복검사와 이메일 유효성 검사이다..
갈길이 너무 많이 먼것같다.....
'공부 > Spring' 카테고리의 다른 글
| [Spring] Validator를 이용한 회원가입페이지 만들기 (0) | 2022.09.05 |
|---|---|
| [Spring] 회원가입페이지 만들기 ( Ajax을 이용한 아이디 중복체크 구현) (0) | 2022.09.05 |
| [Spring] Oracle SQL을 사용하여 마이비트스(Mybatis) 연동하기 (0) | 2022.08.28 |
| [Spring] 프로젝트 구조 변경 및 설정 (0) | 2022.08.28 |
| [Spring] Spring MVC Project 구조 분석 (2) | 2022.08.27 |


댓글